How to Add an RSVP QR Code to a Zazzle Wedding Invitation
Add a free RSVP QR code to a customizable Zazzle wedding invitation. Learn how to place, test and track guest responses in one dashboard.
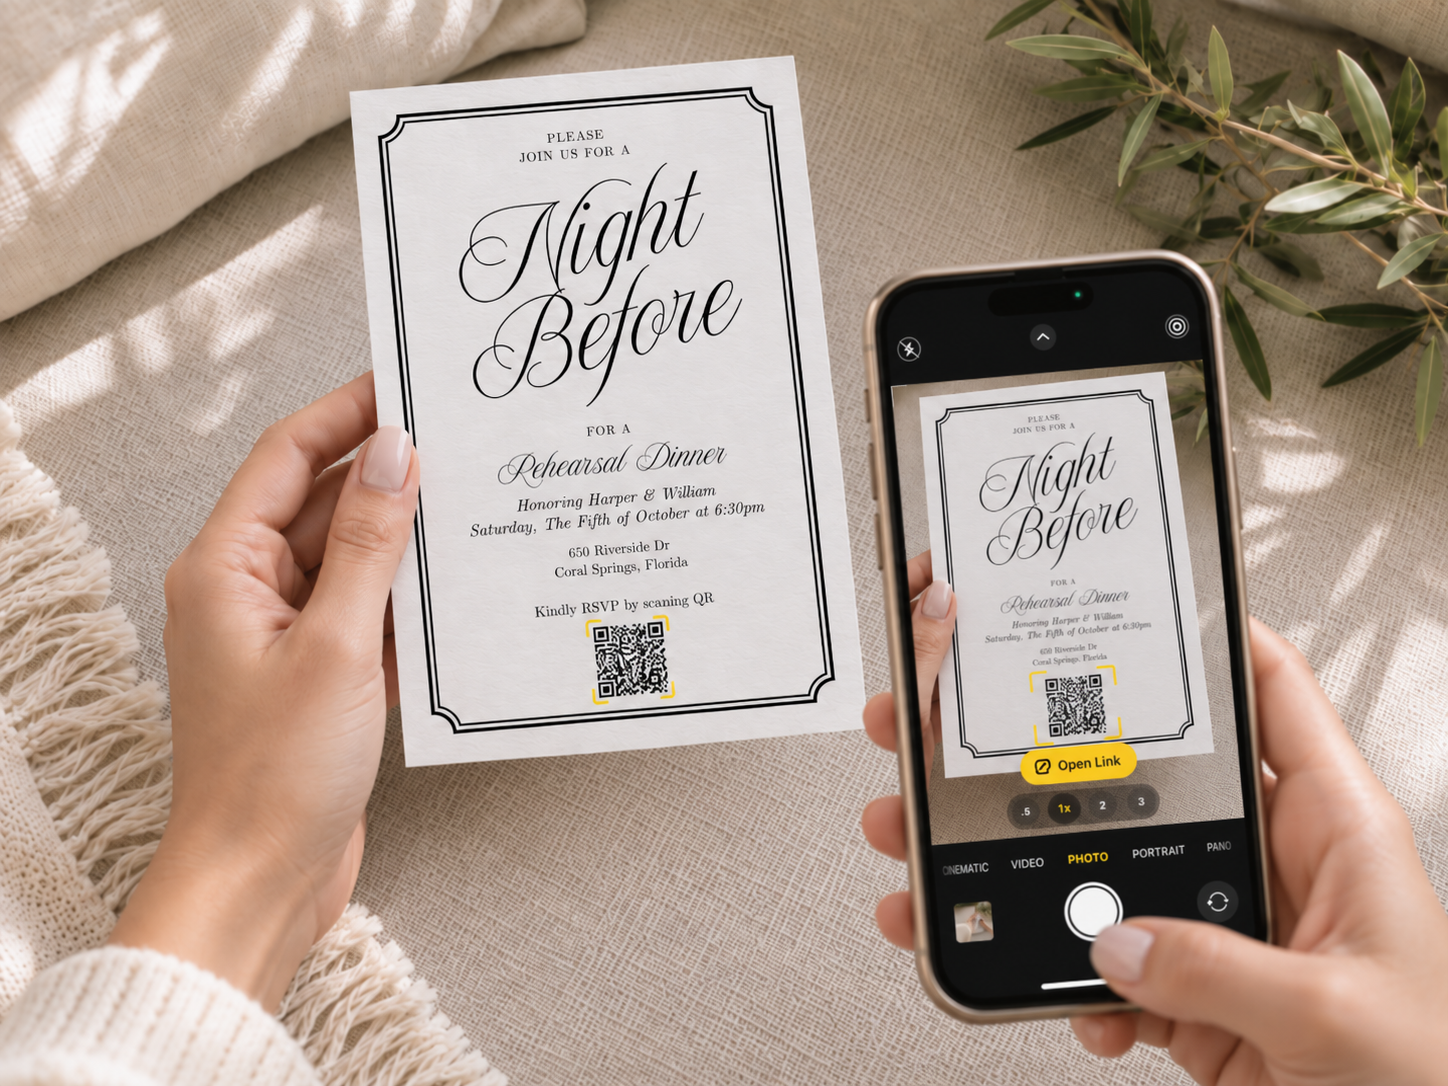
A printed invitation can look exactly the way you want and still give guests a simple way to respond online. Create a free RSVP page in Confrmly, download its event-specific QR code, add it to a customizable Zazzle invitation, then track every response in one guest dashboard.
This is not a native Zazzle integration. The QR code simply opens your Confrmly RSVP page when a guest scans it. That makes it useful when you want to keep the printed invitation process separate from RSVP collection.
What you need before you begin
- A Confrmly host account and your event details
- A Zazzle invitation that is customizable or a blank custom invitation
- A final RSVP deadline
- A phone for testing the printed proof
Zazzle says that creators decide whether a product can be customized. On a customizable product, customers can add new text or images in the design tool. Check this before buying a template. If the invitation does not allow image changes, choose another customizable design, use a blank invitation, or ask the designer whether they can add an RSVP QR area for you.
Step 1: Create your RSVP page in Confrmly
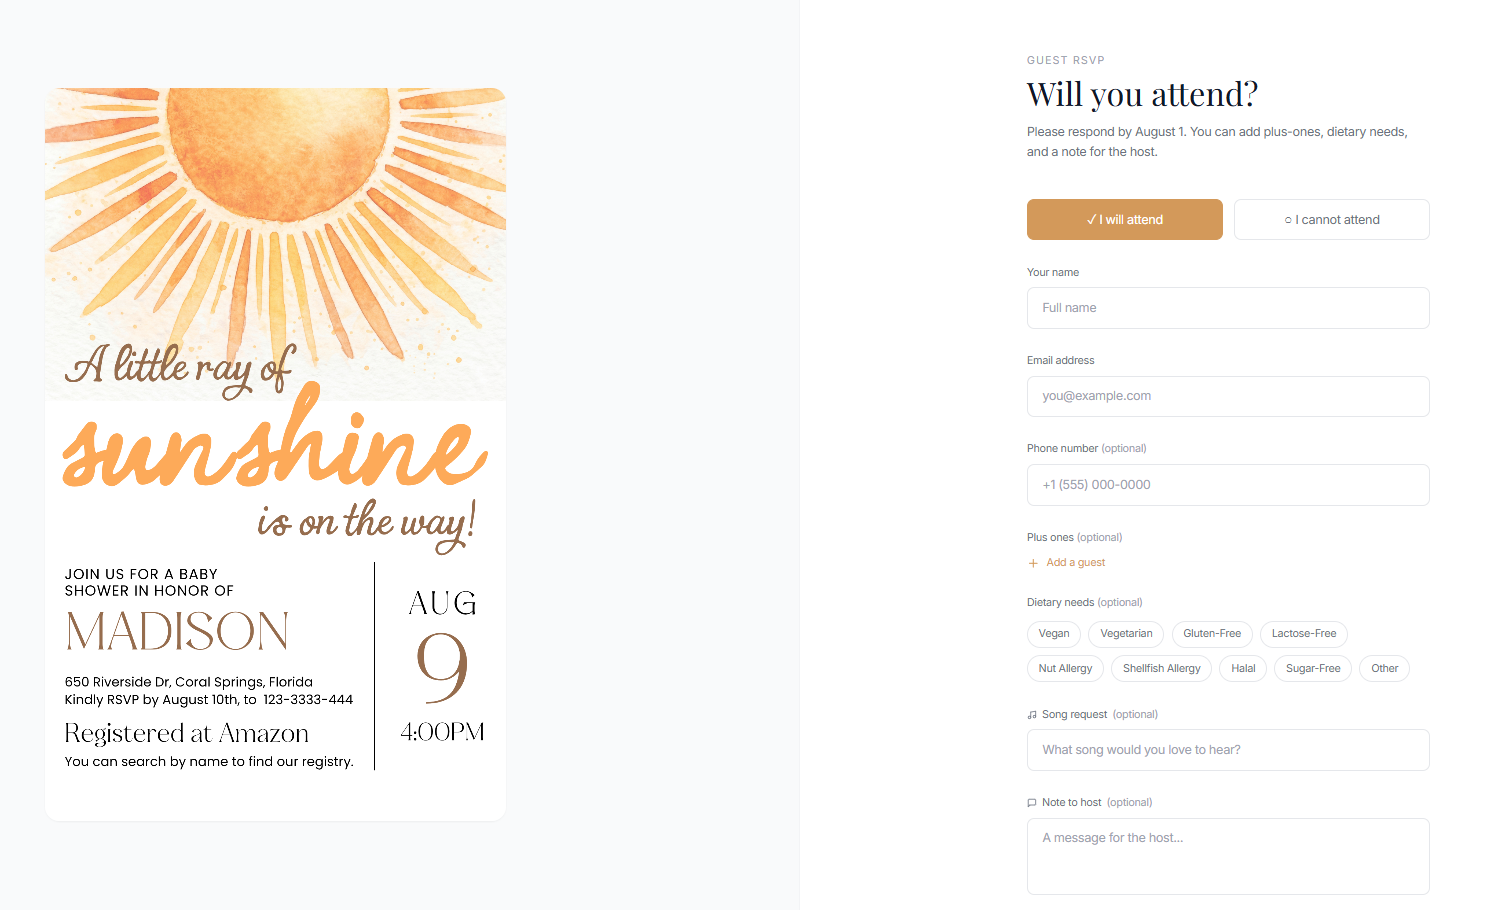
Create your event, add the date, location, RSVP deadline and the questions you need. For a wedding, that may include attendance, plus-one details, dietary needs and a note for the host.
Open the guest view yourself and submit a test RSVP before you share anything. Guests do not need a Confrmly account or an app to respond.
Step 2: Download the event QR code
Open your event in the host dashboard and download its QR code. Keep the shareable RSVP link nearby too. The link is useful as a readable fallback for guests whose camera cannot scan a printed code.
Do not reuse a QR code from a different event. Each code should lead to the specific RSVP page for the invitation you are printing.
Step 3: Choose a Zazzle invitation you can customize
On Zazzle, select an invitation that explicitly offers customization. Zazzle's own invitation guidance describes choosing Customize This Design to open the design tool, where a customizable product can accept new text and images.
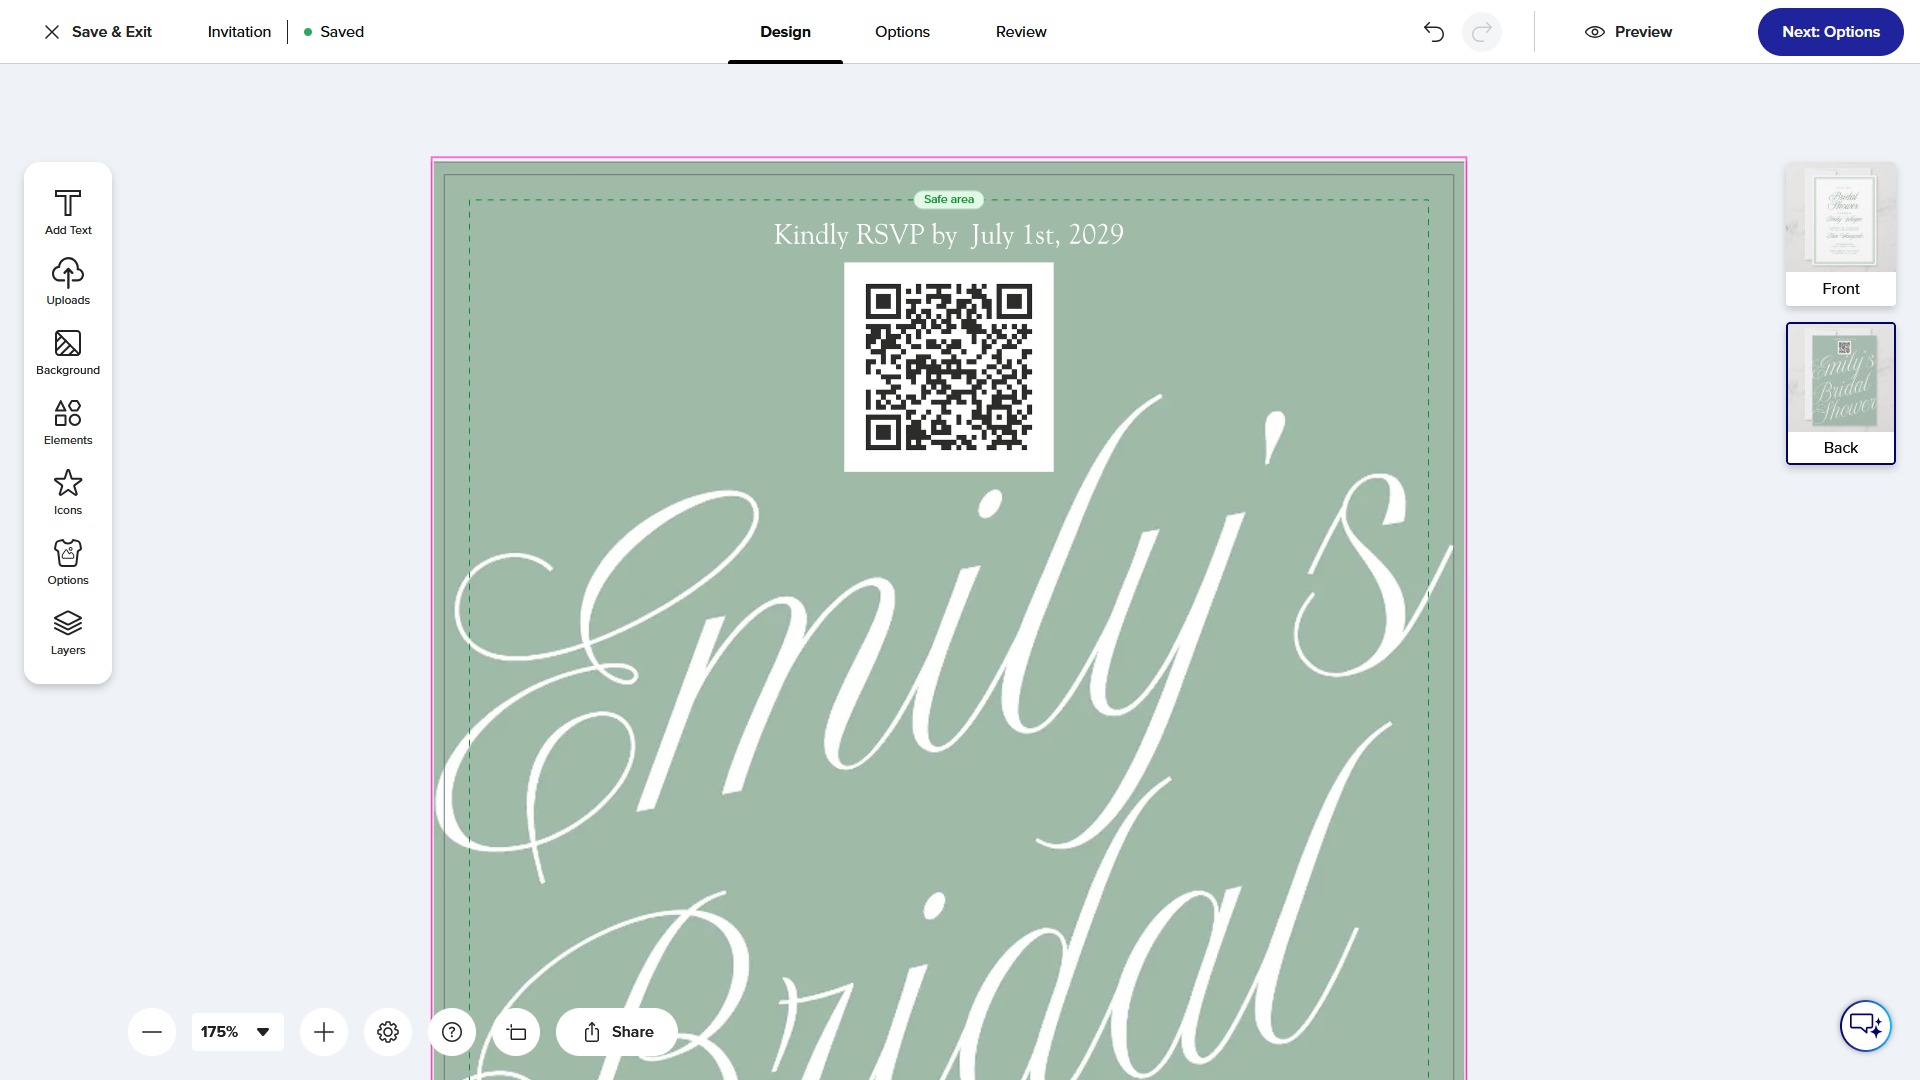
For a QR code, the back of the invitation, a details card or a separate RSVP insert is usually easier to scan than a crowded front design. If your invite has an editable back, use it for the RSVP instruction, deadline, QR code and backup link.
Step 4: Add the QR code without damaging it
Upload the QR-code PNG to the Zazzle design tool and place it on a plain, light area. Do not crop it, stretch it, recolor it or place it over a photograph, pattern or foil effect.
For a printed invitation, start with a code at least 1 inch or 2.5 cm wide. Leave clear space around every side. Add a short instruction and the RSVP deadline close to the code.
Use this wording if it fits your invitation:
Please RSVP by June 1. Scan the QR code or visit your RSVP link.
Replace the sample date with your actual deadline. Add the full RSVP URL in a readable size if your design has space.
Step 5: Order one proof and scan the real card
The design preview is helpful, but a physical proof is the important test. Order one card when the product allows it, or print a test at the intended size before you order the full quantity.
Scan it using more than one phone from normal reading distance. Confirm that it opens the correct event, that the RSVP form is easy to use on mobile, and that a test response appears in your Confrmly dashboard.
If the code fails, make it larger, restore a solid light background and give it more clear space. Do not keep changing the event URL after the invitation goes to print.
Step 6: Track answers instead of chasing messages
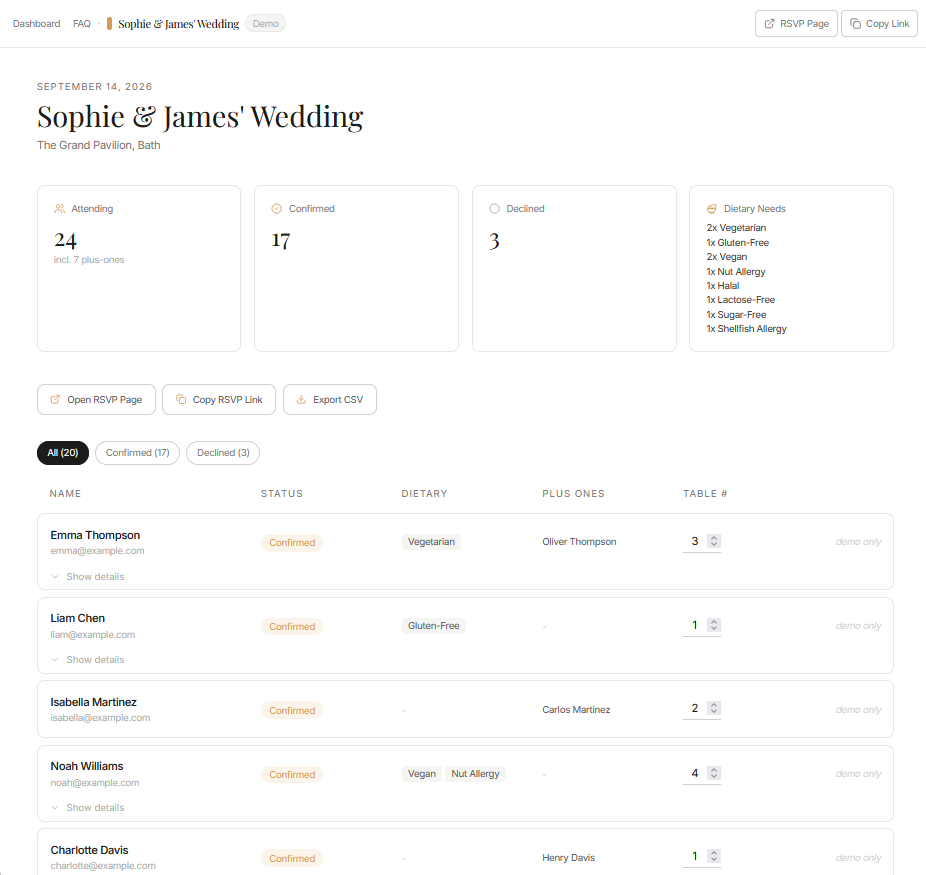
Once guests scan the code, their responses appear in Confrmly. You can review attendance, plus-ones and dietary needs in one place, then export the guest list when it is time to plan tables, catering or follow-ups.
A simple setup that keeps the invitation elegant
Keep the primary invitation focused on the celebration. Put the QR code and short RSVP instruction on the reverse, a details card or an RSVP insert. That gives guests one obvious action without turning the invitation into a form.
If you are sending a digital version of your invitation as well, include the clickable Confrmly RSVP link in the email or message. The QR code is best for the printed piece, while the direct link is the easiest route from a phone or computer screen.
Frequently asked questions
Can every Zazzle invitation accept a QR code?
No. Zazzle states that a creator chooses whether a product is customizable. Use a design that permits image changes, a blank custom invitation, or ask the designer to include a QR-code area.
Does Confrmly connect directly to Zazzle?
No. Confrmly is a separate RSVP service. The QR code or link sends guests from your Zazzle invitation to your Confrmly RSVP page.
What happens after a guest scans the QR code?
They open the event's RSVP page, respond without creating an account, and the response appears in the host dashboard.
Where should the QR code go?
Use the back of the invitation, a details card or a separate RSVP insert. Keep it on a plain background with enough clear space for reliable scanning.
Create your free RSVP QR code
Create an event, review the guest experience, then download the QR code for the invitation you are about to print. You can keep your invitation on Zazzle and still have a clear, organized way to collect replies.
CTA: Create your free RSVP page
Related Confrmly guides
Sources
Ready to send invites?
Create your event on Confrmly
Use this template for your design, then set up your RSVP page to collect responses elegantly.
Get Started Free