How to Embed RSVP in Canva Website Invitations
Add a customizable RSVP form to your Canva website invitation in six steps, or use an embed code on another website. Includes a reusable starter for template sellers.
Your invitation can look exactly how you designed it and still give guests a clear way to reply. Confrmly adds a compact RSVP panel to a published Canva website invitation, with colors you can match to your design.
Guests choose Yes, Maybe, or No on the invitation. A new tab opens the full Confrmly RSVP page with that choice selected. They enter their details and press Submit RSVP there. Clicking a choice alone does not submit a response.
This guide covers the six steps shown below, the reusable starter for designers and template sellers, and the separate HTML embed option for other websites.
See the two live examples
- Starter invitation example: the buyer sees Create your RSVP event and can begin setting up their own event.
- Event RSVP invitation example: guests see the three RSVP choices linked to an existing event.
These are demonstrations, not Canva template-copy links. You do not need to submit a test response to explore the layout.
Before you begin
Have a Confrmly host account, an event, and an editable Canva website invitation ready. If you are new, register as a host, then create your event. The interactive embed is intended for a published website, not an exported JPG or printed invitation. For print, use the event's RSVP link or QR code instead.
Choose the correct sharing option: Canva's Embed app takes the URL from Copy Canva URL. A website HTML block takes the complete snippet from Copy embed code. The regular Copy RSVP Link is for opening the full guest page; it is not the compact Canva embed URL.
1. Create your event and open its dashboard
In Confrmly, choose New event, enter the title, date, time, location and RSVP deadline, then create the event. Open its dashboard and check the details before sharing the invitation.
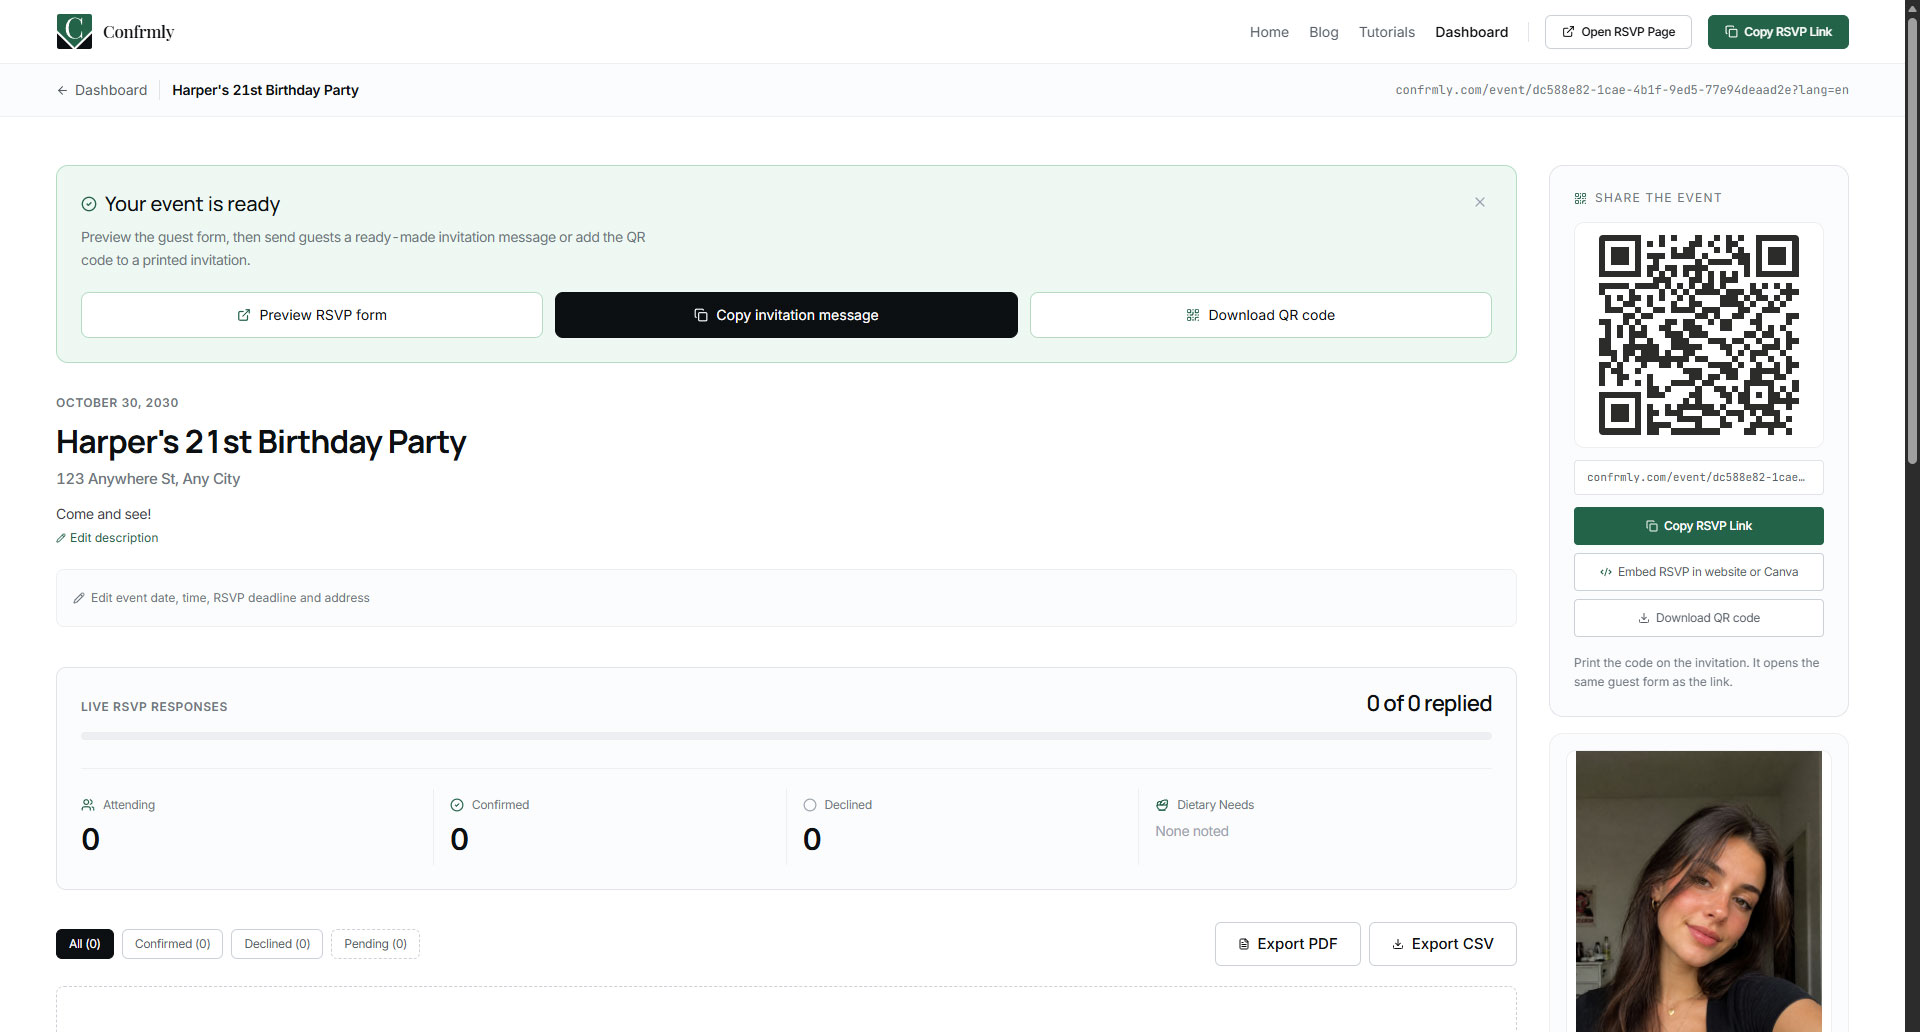
In the Share the event panel, select Embed RSVP in website or Canva. This opens the form designer and the two copying options used in the next steps.
2. Match the form colors to your invitation
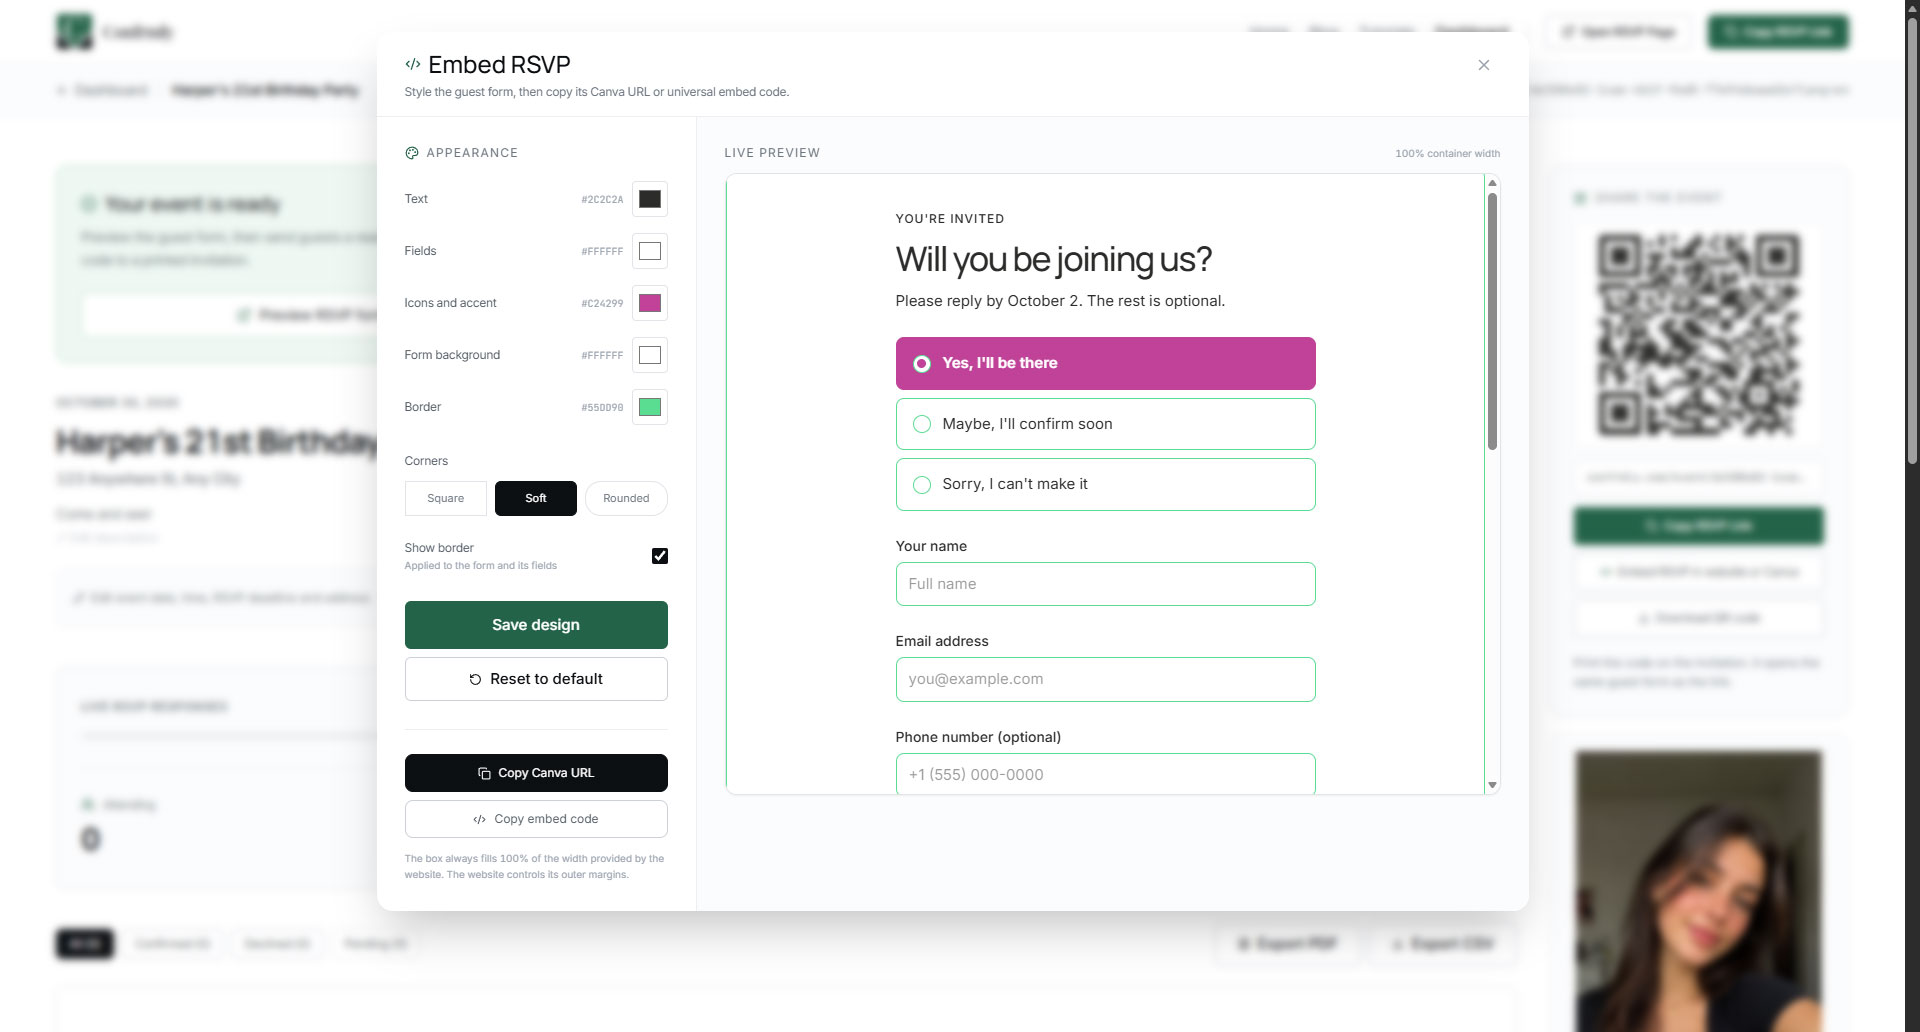
In Embed RSVP, use the appearance controls to adjust Text, Fields, Icons and accent, Form background, and Border. For example, match the form background to a white section of your invitation and choose an accent that works with your design. Keep enough contrast so every label is easy to read.
The default palette is black, white and gray. You can replace it with your own colors. Existing events with saved custom colors keep their designs. The starter's setup button is black; the color controls shown here belong to your event's guest form.
Check the preview, click Save design, and wait for the save confirmation. Then click Copy Canva URL. It copies a link containing /embed/rsvp/ and your event's ID. Use the copied value as it is, including any language parameter.
3. Open your Canva website invitation
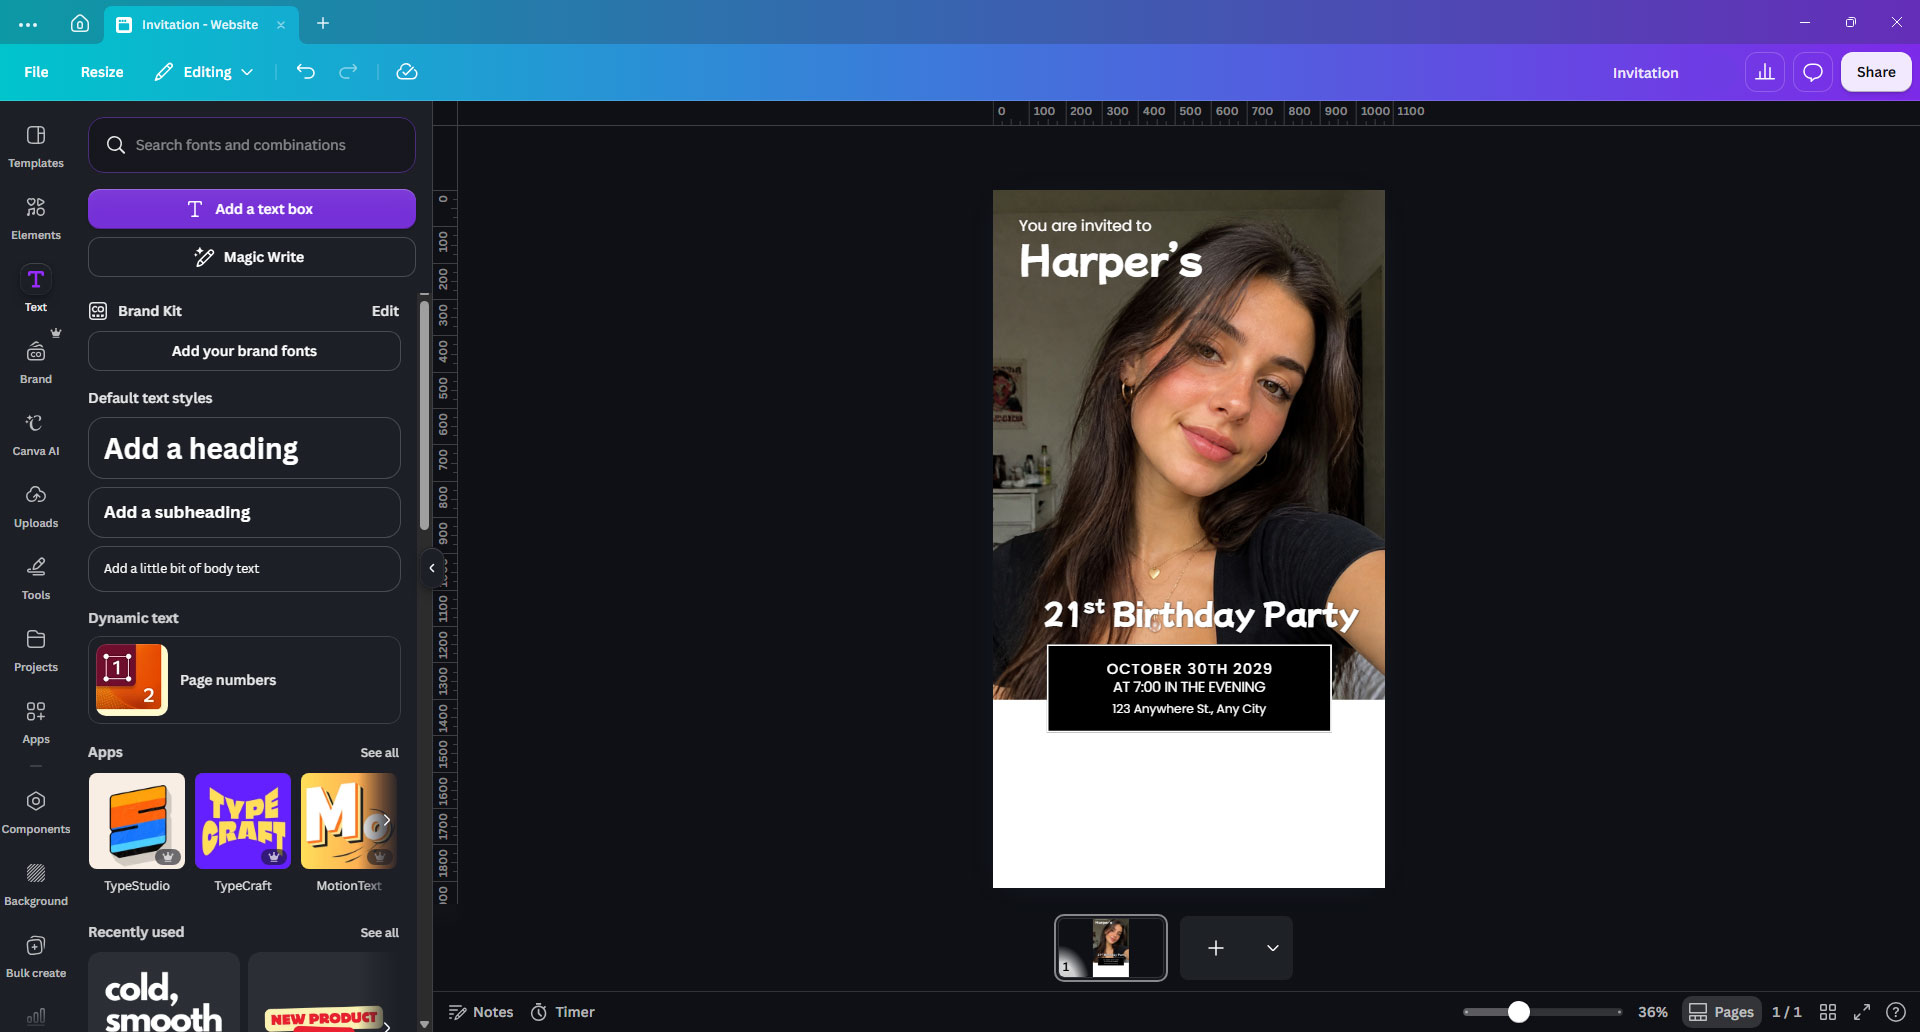
Open the invitation in Canva and decide where the RSVP panel should sit. Leave a clear area beneath your event details or elsewhere in the layout. A plain background makes the embedded panel easier to blend into the design.
Make sure the date, time and location on the invitation match the details in Confrmly. Editing text in Canva does not update the event in Confrmly, and editing the Confrmly event does not rewrite your Canva design.
4. Find Canva's Embed app
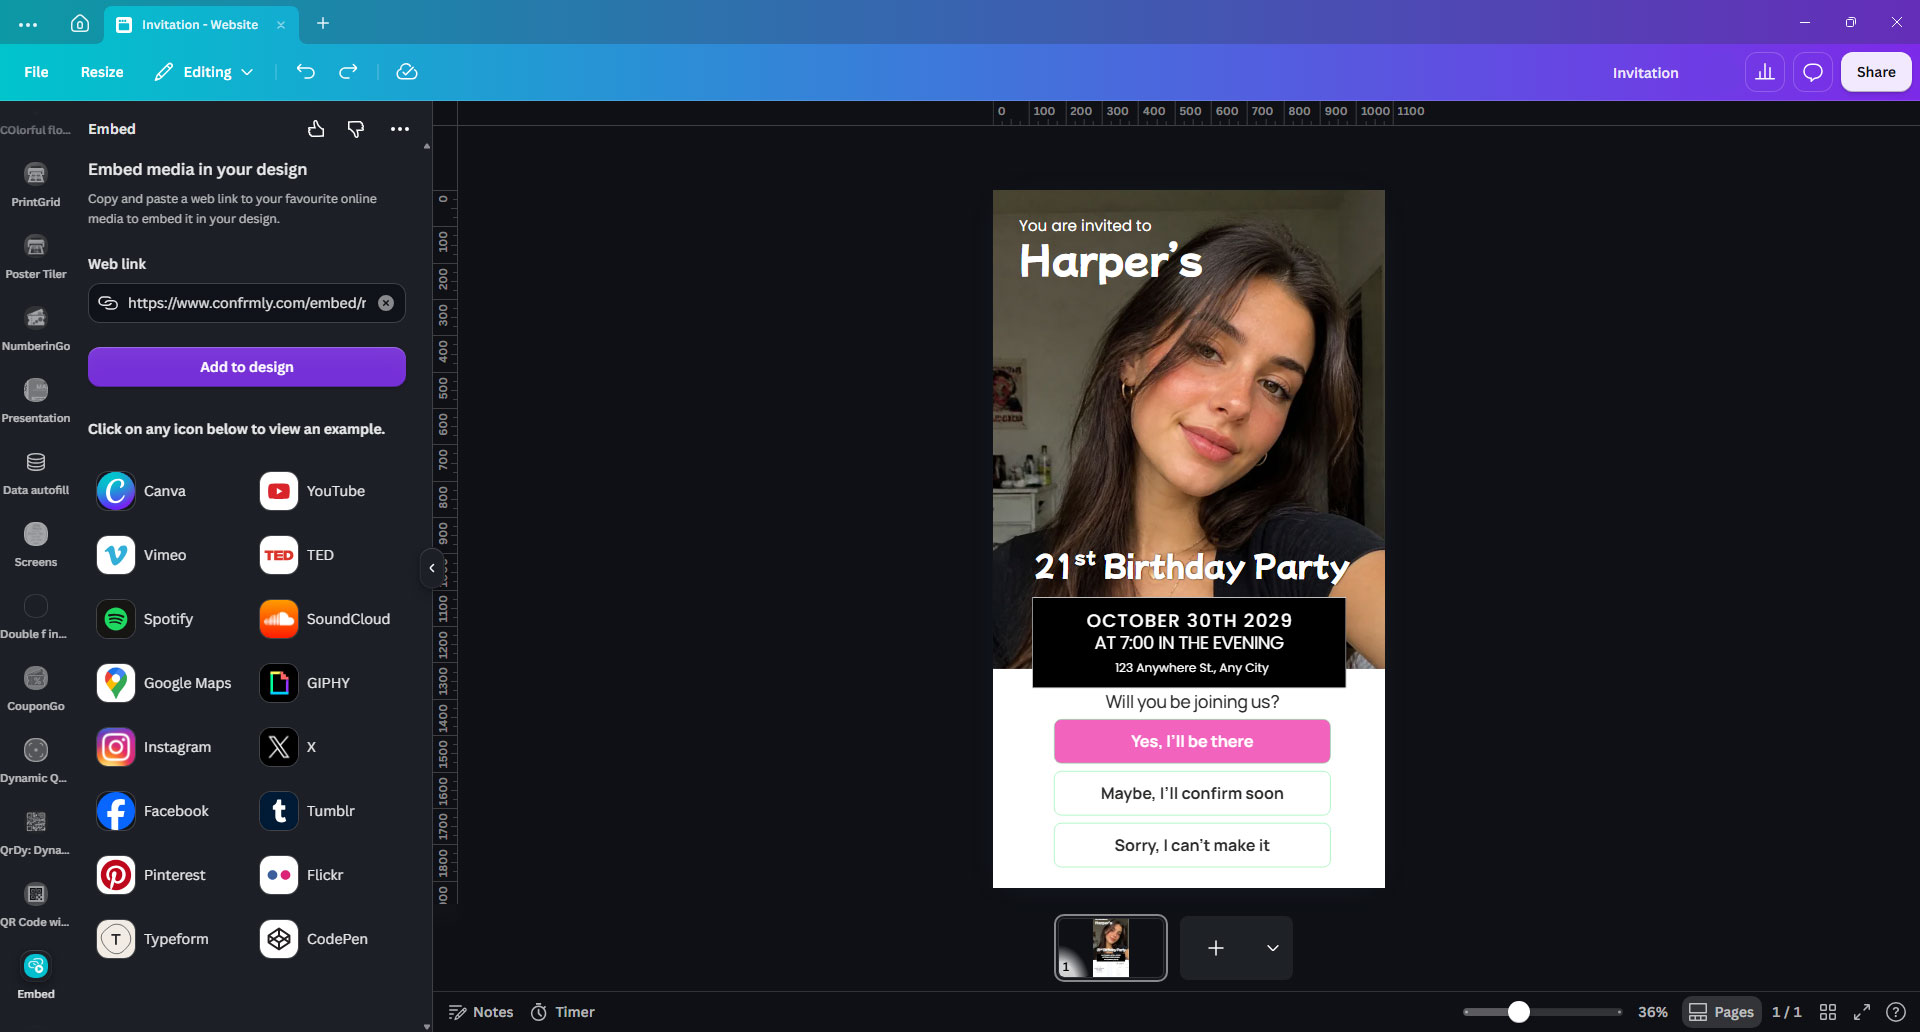
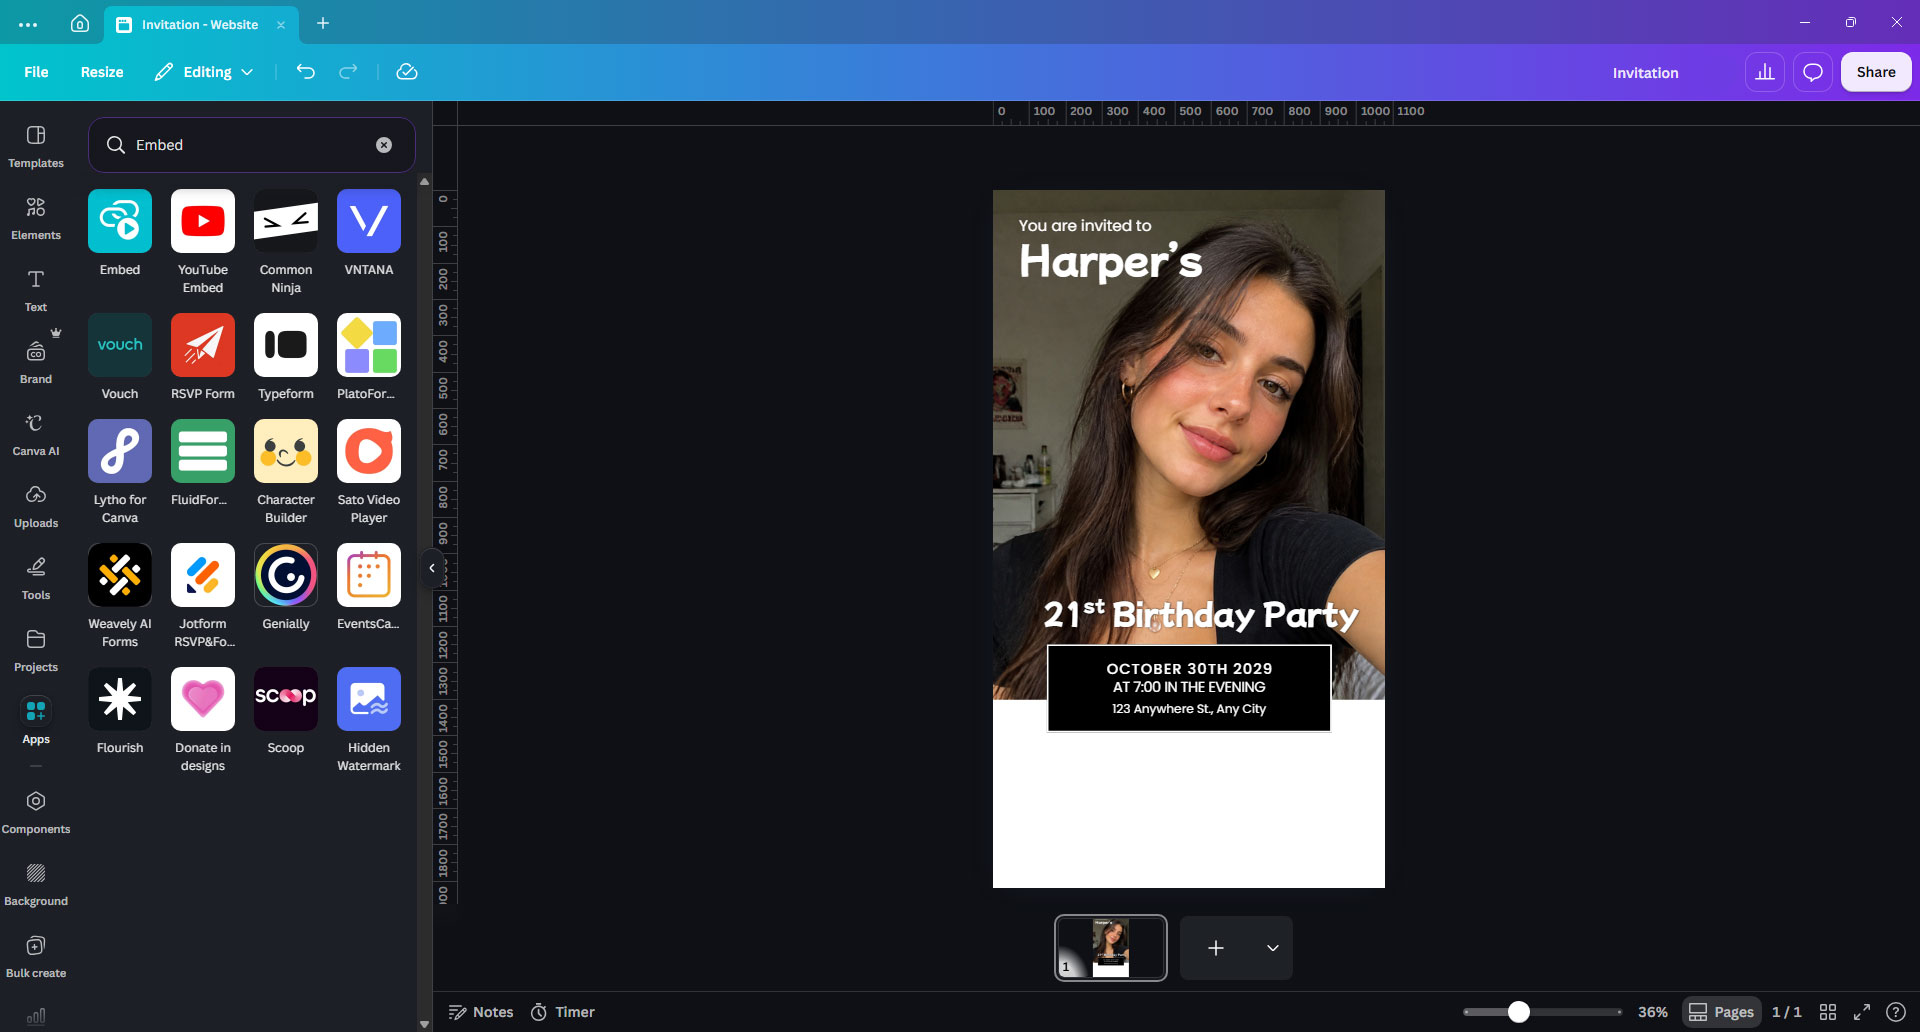
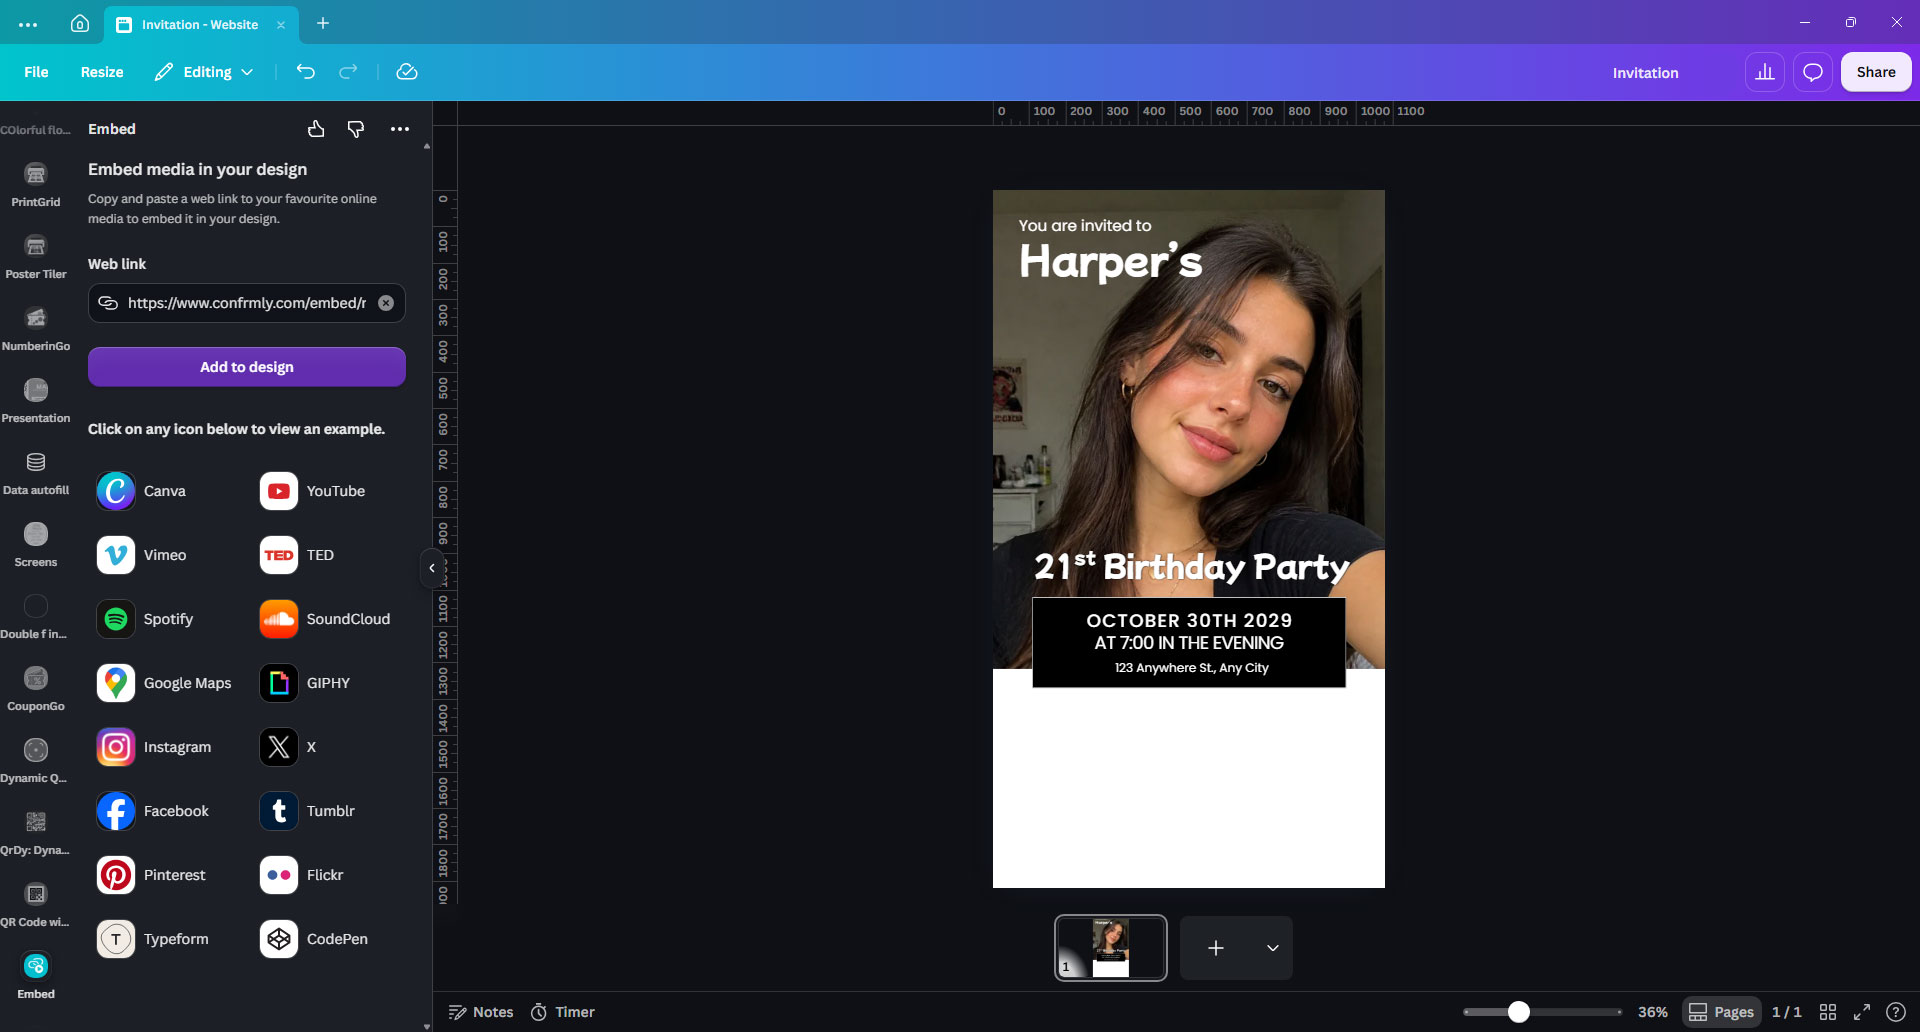
In Canva's left sidebar, open Apps. Search for Embed and select the app named Embed. The screenshot shows its turquoise icon. This is the app used in this workflow, not a separate form-builder app or a text hyperlink.
5. Paste the Canva URL and add it to the design
Paste the value from Copy Canva URL into the Embed app's Web link field. Click Add to design and wait for the panel to load.
Paste the URL, not HTML. Do not put an <iframe> or <script> snippet into this field. Do not use the website homepage or the ordinary /event/ link. The dedicated embed URL displays the compact RSVP choices.
6. Position the RSVP panel manually, publish and test
Canva adds the embed as a design element. Drag it into position and resize it manually using Canva's handles. Confrmly does not automatically place it beneath your event details or align it to other elements. Check the margins, text size and overlap with nearby content.
Publish the design as a website, then open the public link in a regular browser. Check desktop and mobile layouts. Click each choice and confirm that the full RSVP page opens in a new tab for the correct event with the intended answer selected. Guests still need to complete and submit that form.
For designers and template sellers: use the starter embed
A template can be sold to many buyers, but each buyer needs a separate event and guest list. Instead of placing your own live event in a reusable template, use this shared starter URL:
https://confrmly.com/embed/rsvp/start
The Confrmly Dashboard includes a visible For designers & template sellers section with this URL, a copy button and short instructions. Add the starter through Canva's Apps > Embed workflow, just as you would add an event embed.
- The seller includes the starter in the digital website template.
- The buyer clicks Create my RSVP event. Confrmly opens in a new tab, where they can sign in or register if needed and create their own event.
- The buyer customizes the event form, saves it, copies their Canva URL, removes the starter element from their Canva invitation, and adds their personal event embed.
- The buyer publishes and tests their invitation before sending it to guests.
The starter does not collect RSVPs and does not automatically connect itself to a buyer's event. Replacing it is a required step. Never reuse one seller-owned live event for multiple customers.
Add RSVP to another website
Option A: use an HTML or custom-code block
Open your event's Embed RSVP dialog and select Copy embed code. Paste the complete snippet into your website builder's HTML, custom-code or iframe-capable embed block. Unlike Canva's Web link field, this block must accept HTML.
The Confrmly snippet contains an iframe and a small resizing script. It fills the available container width; your website controls where that container sits. If your platform removes scripts, automatic height adjustment may not run, so use its supported sizing controls and check for clipping or extra space. The platform must permit interactive embeds and opening the guest page in a new tab.
Option B: use an Iframely-powered URL block
If your platform uses Iframely or oEmbed to turn supported URLs into interactive content, provide the dedicated Confrmly embed URL to that integration. Iframely can return HTML embed code for supported rich content; a plain link card is not the same as a working form. Follow the platform's supported embed workflow and test the result. See Iframely's oEmbed documentation for how URL-to-HTML embedding works.
Copy embed code is Confrmly's direct HTML snippet, not a personal Iframely API key or an Iframely account. You do not need to register with Iframely for the Canva steps above. Other services may have their own provider, plan or script restrictions, so compatibility is not guaranteed on every website builder.
Quick troubleshooting
- A link card appears instead of the form: copy the dedicated Canva URL again and add it through Apps > Embed, not as a normal hyperlink.
- The form looks too small or sits in the wrong place: select the embed element and adjust its size and position manually. Check the published mobile layout too.
- Your new colors are missing: save the design in Confrmly, then refresh the published invitation. Embedded previews can retain an older version temporarily.
- A click seems to do nothing: the RSVP page opens in a new tab. Test the published website in a regular browser and check whether that browser blocked a new tab.
- Guests see Create your RSVP event: the buyer has not replaced the starter with their personal event embed yet.
Ready to try it? Create your Confrmly event, match the colors to your invitation, and add your personal RSVP embed.
Ready to send invites?
Create your event on Confrmly
Set up your RSVP page, share the link with guests, and keep their responses in one place.
Get Started Free